Showing posts with label isabel marant. Show all posts

27.9.13

Wishlist: Isabel Marant X H&M favorites

Image Hosted by ImageShack.us Image Hosted by ImageShack.us Image Hosted by ImageShack.us Image Hosted by ImageShack.us
It started Wednesday: the first images from Isabel Marant X H&M appeared on in the internet; yesterday the full lookbook was online. WITH the prices... and damn you H&M. You are charging us way too much. But I have to say, I'm in LOVE! 
I really like the jacket on the first photo; but it;s 299 euro, which I find too expensive. The next two looks I want to have completely. I love who the boots are chunky, would really love to have those. Although they would be better if the heel was a wedge... but who am I to complain? 

What do you think about the Isabel Marant X H&M collection? 

Follow me:
instagram: @amysfashionscrapbook

16.12.12

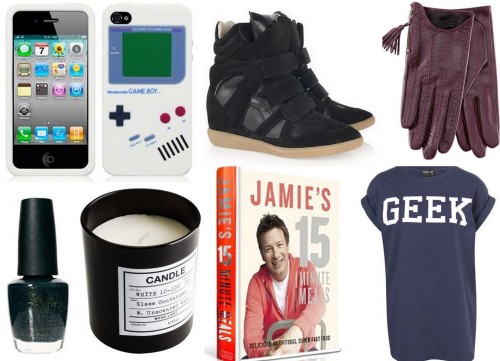
Wishlist: The Christmas List 2012


Yeah, I know: I'm late with my christmas wishlist! But time is just flying by! I can't imagine that we'll be cellebrating christmas in just a week! I have to start my christmas shopping. The boy and I did some shopping in London, so a few things on this list are already under my tree. Not telling you which ones just yet. One thing is sure: the Isabel Marant sneakers aren't under my tree yet; so this is my new tactic: ask cheap things, so that they only big gift on your list is that one designer item you want. Not sure if it will work though!

For now: what's on the list?
1 - Iphone Game Boy case - I used to have this old skool model game boy! (via Play)
2 - Isabel Marant sneaker - pure love (Via Mayke)
3 - Leather gloves (via H&M)
4 - OPI Jams Bond Live and Let Die (Via ASOS)
5 - Candle - perfect for my new house (Via H&M)
6 - Jamie's 15 minute meals - ideal for my busy life - (Via Bol)
7 - Geek Tee - love it! (Via Topshop)


Well had a great weekend, (follow me on instagram @amysfashionscrapbook to stay updated!) More on that later. For now: Enjoy your Sunday eve!


Follow me:

Photo's: by the different webshops, collage by me


9.7.12

New in: Just Like Marant


I scored this fishnet dress at the Zara sale, it reminds me a lot of the fishnet dress of Isabel Marant which I first saw on the blog of Lovely by Lucy (see her outfit post here). It fits me like a glove, it's just perfect! Even the BF likes it, (and that means something, since he hates fishnet style clothes!). Outfit will be on the blog soon!


Follow me:

Photo's: by me

25.6.12

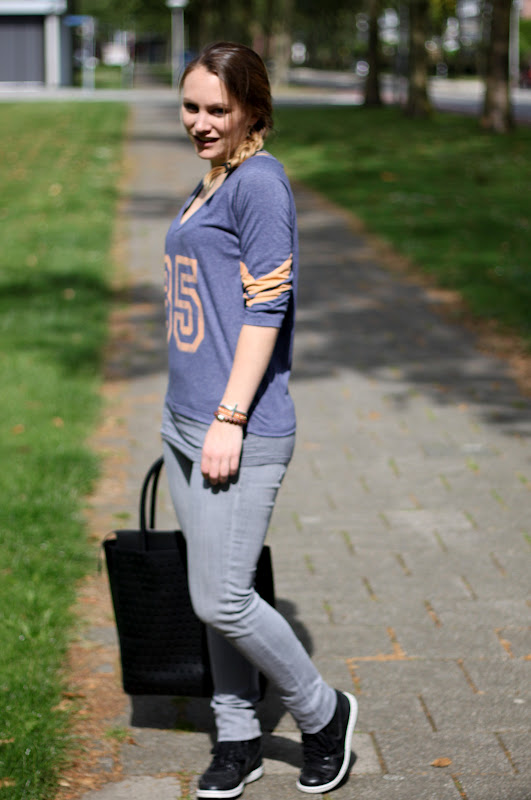
Outfit: Number 85


Saturday's outfit. I was running errands all day, and I only had a short night of sleep. So easy was key. Since I also needed to test my tent for the upcoming festivals, it all had to be really comfy aswell. So what better to wear then this Isabel Marant inspired tee that I got from Nelly.com? Paired up with sneakers and jeans, and I was good to go!

Did you have a nice weekend?
I'm wearing:
Number Tee: Nelly trend | Grey top: Bershka | Jeans: H&M | Sneakers: Nike | Bag: H&M trend | Mini armparty: Fashionology + H&M | Nailpolish: Catrice

Follow me:

Photo's: by My life as Matt

25.5.12

D.I.Y. Tutorial: Tie Dye Shorts


After seeing all the tie dye items on the catwalk (think Isabel Marant) I decided to make my own tie dye shorts. (Sorry miss Marant, I just can't spend that kind of money on a pair of shorts at this time in my life :))

So this is my first ever DIY project. I wasn't planning on posting the process of my new shorts, but since I take photo's of everything I do with my Blackberry, and some of you guys were asking about them I decided to make this tutorial. 

You'll need:
- Pair of jeans (the darker the jeans, the better it'll work)
- Rubber bands (I used 8)
- Bucket
- Thick bleach
- Household gloves
- Sharp scissors 
- Measuring tape
- Optional: sewing machine

Step 1: Twist the legs of the jeans in knots and place a rubber band on them to hold it in it's place. Roll and the twist, and put rubber bands around the jeans until you have a little package. Make sure it'll all stay in place. It is better to soak your jeans in water first, so it'll roll easier; but I forgot to do that. 

Step 2: Fill a bucket with warm water and add a generous amount of thick bleach. I used 1/3 of the bottle. But pored more in over the amount of time, because I was getting impatient. 
Also the jeans I used weren't that dark, and were second hand (thanks mum!) so I found them hard to bleach. If you use new dark jeans, the effect will be better visible. I left the jeans in there for nearly 24 hours. But I recommend you to check after 10 hours. If you use a cheaper style jeans, it could get holes in the fabric if you leave them in too long. 

Step 3: Rinse out your jeans. Make sure you were gloves, and don't breath in all the chlorine. I seriously got high during this part. Remove all the rubber bands and rinse again. 

Step 4: Pop your jeans for a short cycle in the washing machine. I actually washed it twice, once with detergent, but I used so much that I did another cycle without adding anything. (After this the jeans still smell of chlorine though). 

Step 5: Let the jeans dry

Step 6: When completely dry, put your jeans on to see where you want to cut them. Make sure to leave a little fabric if you want to make a hem of some kind. Use your measuring tape to make sure both legs are the same length. 

Step 7: Cal your mum! ;) Seriously, I had to call my mum and pop over there to have access to a sewing machine. I choose to just stitch it loosely around the bottom, so the ends would look a ruffled. I wear the seem flipped up (see the last picture). 

Step 8: Combine you new tie dye shorts to create a great outfit & enjoy summer! 

By the way: I choose to first tie dye the jeans, before cutting them short; because then I had more fabric to twist, and gave a better dye result. But you can easily do it the other way round if you prefer. 

Hope you liked my first tutorial. I would love to hear your comments and questions!


Follow me:


Photo's: by me 

Related Posts Plugin for WordPress, Blogger...